If you want to reserve a microscope and boxes with slides, please contact Dr. Michael Hortsch. You will need to sign a loan agreement to obtain a locker key and you will be responsible for the slide collection. The slide boxes and the microscope may not be removed from the laboratory. You will be charged $8 for any broken slide.
- Before putting a slide on the stage - turn on the illumination & set the light to a comfortable level. IT IS NOT NECESSARY to use the light at maximum - to do so can be very tiring to the eyes.
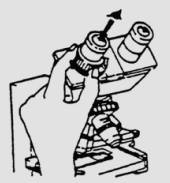
- Rotate the 4X objective into position.
- Gently rotate the left EYEPIECE diopter ring such that the marks (usually dots or hash marks) on the diopter ring and the eyepiece tube line up.
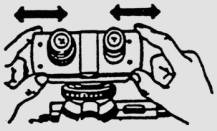
- Adjust interpupillary distance so right & left images merge into one.
If you wear glasses for mild near- or far-sightedness, you generally won’t need them while looking through the scope –the microscope can defocus or overfocus the image as needed. However, if you have astigmatism or a heavy prescription, you may find it necessary to wear glasses –just keep in mind that the oculars may scratch your lenses, particularly if they are plastic.
- Be sure your slide is clean.
- Be sure the oculars are clean - USE LENS PAPER ONLY!
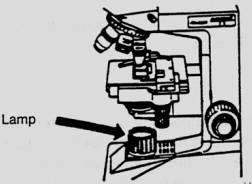
- The glass of the Lamp Housing MUST be clean
- Now, place a slide on the stage, COVERSLIP UP!
- Raise the Condenser upward toward the slide GENTLY! - as far as it will go.
a. Set condenser diaphragm at 30 to start out. You can vary the condenser diaphragm to control CONTRAST & DEPTH OF FIELD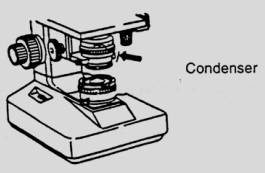
- Using coarse knob, focus using the 10x objective. Then adjust with FINE FOCUS knob on SMALLEST detail visible in the field.
- Now position 40x objective & adjust FINE FOCUS knob - you SHOULD NOT NEED TO TOUCH COARSE knob.
- Last EYE PIECES adjustment
- First - close LEFT EYE – then focus the image for your RIGHT EYE using fine focus knob.
- Now, close right eye and using ONLY DIOPTER RING adjust for LEFT EYE.
- If you have performed these steps: for the remainder of the current lab - it should only be necessary to adjust the FINE focus knob - regardless of the slide or objective that you use. BE AWARE! You share this locker with other medical (M2) and graduate students and these scopes are subject to a lot of jostling around.THEREFORE, you would be wise to follow this method of scope adjustment at the beginning of each lab - if you want to obtain the greatest value for each lab.